Mirage Quick Start Guide V0.1
This guide covers the following topics:
- Installation
- Network Manager GameObject
- Player Movement
- Initiate Server By Scripting
- Network Manager Hud
- Names And Colours
- Weapon Switching
It is best to first make a mini practice game before converting your single-player game or creating your ideal brand new multiplayer.
The Pre-made Mirage examples are great for using as reference, it is recommended to use them regarding connection setup, with ports and firewalls. This can be a huge topic that changes from person to person and is not covered in this guide, here we will use localHost (multiple games on the same PC). To achieve this, let's first create a new blank project on Unity Hub, after the editor opened up, we can move forward.
Installation
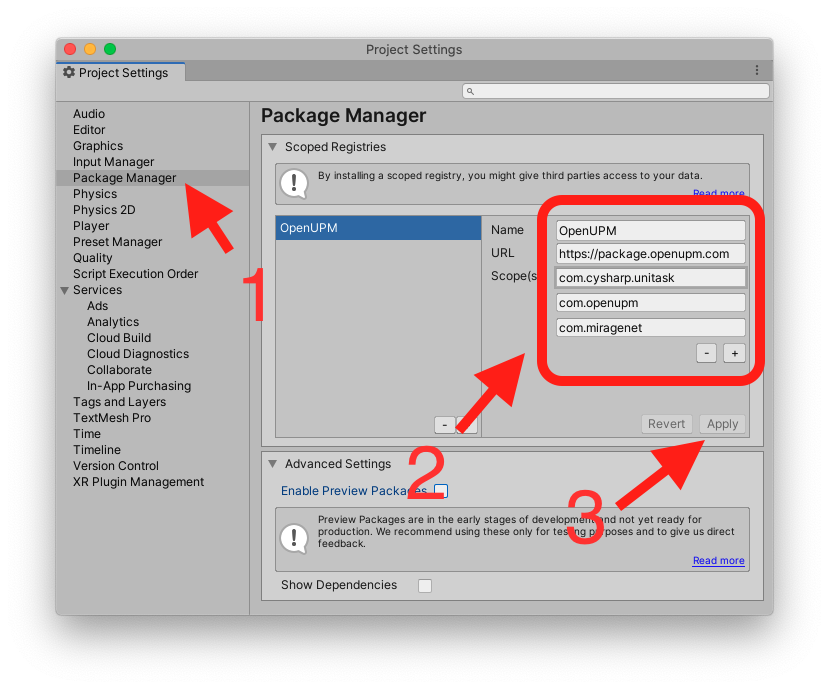
Before everything, to install Mirage we need to add a new package manager repository to our project. To do this, we can go into Edit menu and then Project Settings.
This will open a new Editor Window with multiple tabs. The one we are looking for is Package Manager, so click there.
Once you click there, you should add a new Package Manager, so complete the fields as we show next and click apply
Name: OpenUPM
Url: https://package.openupm.com
Scopes:
- com.cysharp.unitask
- com.openupm
- com.miragenet
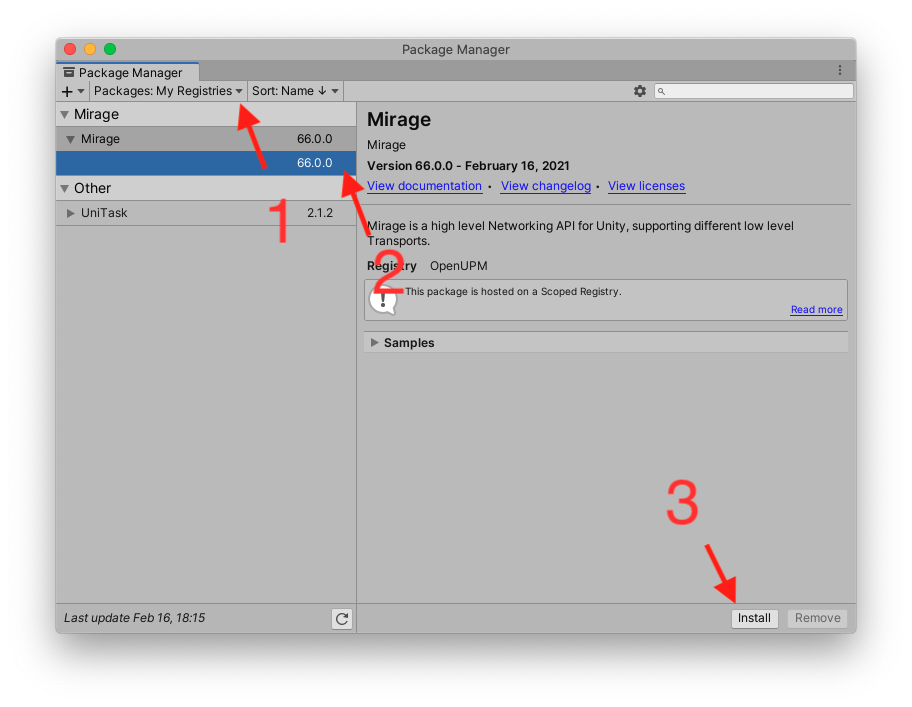
Once everything is ready, the next step is to close the Project Settings window, and jump into the Package Manager. So for this, we click on Window menu and then Package Manager.
At this window, we will click on a small button that says (probably, at today date on Unity Editor 2021.13f) Packages: In Project, here we have to select My registries.
Once, you've done that, we should be able to see Mirage and a few transport and also plugins in that list.
After selecting, you can choose the version on the list below the name, otherwise, you can just click install on the bottom right part of the window and after a loading bar, that's it. You already have Mirage API on your code, congrats!
Mirage already includes a UDP transport, so for this guide is not necessary to download anything else than Mirage.
Creating A Network Manager
Here we will be following a couple of steps, so it is easier to follow me.
- Right-click on your Scenes folder, then click on Create new scene, save it as
Main Scene, and add it to build settings - Mirage already has a menu for creating a base network manager, so right-click on your Scene hierarchy then go to
Create => Network => NetworkManager - Now you will see a pre-configured GameObject called
NetworkManager
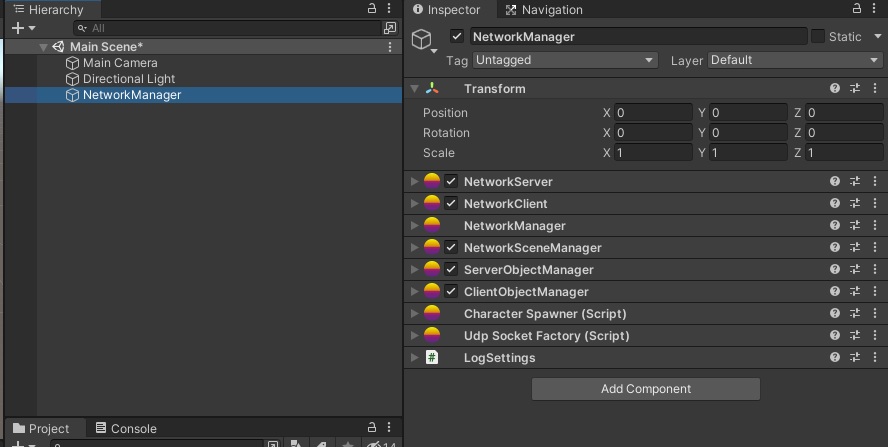
Important stuff about these objects
CharacterSpawner is the one will be in charge of spawning your player later, so this is very important object.
Since we are not changing scenes between server open or close, we could disable the NetworkSceneManager, but we can leave it as it is.
UdpSocketFactory is the one that does the connection, so you can change the IP and port if necessary there.
Now let's set up a few things on the scene, to make it look more like a game
- Add a simple Plane floor with:
- positions (0, -1, 0)
- scale (2, 2, 2)
- Next, we add a GameObject, name with the name
StartPosition1- set position (1, 1, 1)
- We go back to our
NetworkManager GO, overCharacter Spawnercomponent we will change thePlayer Spawn Methodfrom Random to Round Robin.- As a second step, we will add to the
Start Positionslist the one we created in the previous step.
- As a second step, we will add to the
- (Optional) you can create more positions if you want, and you can add them to the list, is not necessary but maybe looks nice.
Player Movement
So after we configure the basics, we need to create our player prefab in order to be able to spawn ourselves in the network. As before, we will follow a couple of easy steps.
- Create a capsule in the scene hierarchy and name it Player
- Attach a
NetworkIdentityandNetworkTransformcomponent into the capsule. - Tick Client Authority on the NetworkTransform
This is how our Player GO components should look right now
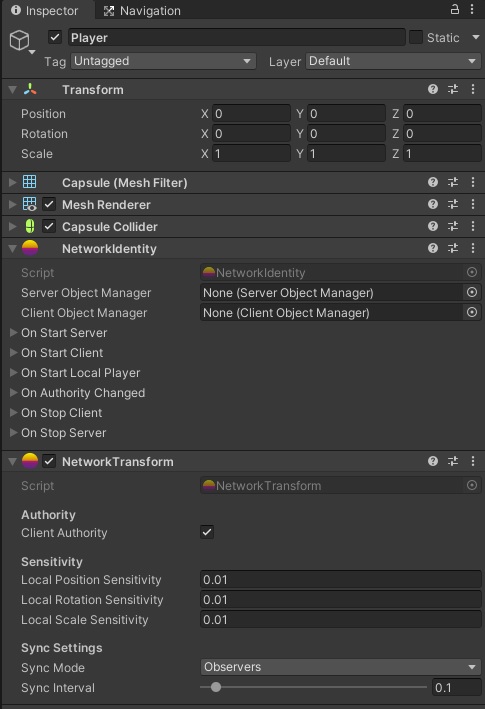
NOTE: Is not needed to set anything else here, Server Object Manager and Client Object Manager will be set dynamically by Mirage later.
Next steps:
- Add a new Script, call it
PlayerScript - Then drag this GO with the mouse into the assets folder (You should probably create a Prefabs folder later as a good practice) and release the mouse there. That will create a Prefab for us. (You can notice this was successful because your GO icon in the scene hierarchy will be blue now)
- Then delete Player from the scene
At this stage, our player is done, so right now we need to tell Mirage who is our player in order to spawn it.
So this is very easy, just go to your NetworkManager GO and open (if it is not) Character Spawner, then drag the player prefab we created before in the Player Prefab field.
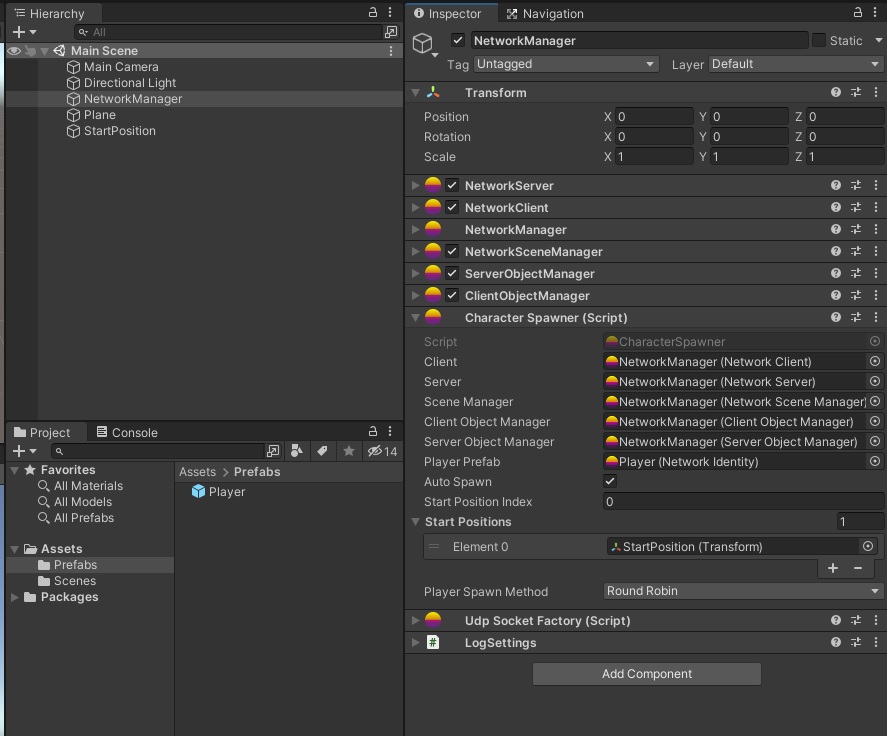
The last step we will need to do is simple: go to the script we created before (you can go into the assets folder and it will be there) and double click it and it will open your IDE. So what we will need to do is simple: tell how we are moving the user, and also to set the camera as a child of the player.
We can do that simply like this:
using Mirage;
using UnityEngine;

namespace GettingStarted
{
    public class PlayerScript : NetworkBehaviour
    {
        private void Awake() {
            Identity.OnStartLocalPlayer.AddListener(OnStartLocalPlayer);
        }

        private void OnStartLocalPlayer()
        {
            Camera.main.transform.SetParent(transform);
            Camera.main.transform.localPosition = new Vector3(0, 0, 0);
        }

        private void Update()
        {
            if (!IsLocalPlayer) { return; }

            float moveX = Input.GetAxis("Horizontal") * Time.deltaTime * 110.0f;
            float moveZ = Input.GetAxis("Vertical") * Time.deltaTime * 4f;

            transform.Rotate(0, moveX, 0);
            transform.Translate(0, 0, moveZ);
        }
    }
}
Press play in Unity editor and... what happened? Why is our player don't spawning? Well, the question is very simple. You need to start the server somehow, and that's what coming next, but before...
Types of servers
On Mirage has two types of servers:
- You can create a server-only game, which runs as an Authoritative kind, and takes decisions for every player and you must join always as a client (For more info you can click here).
- You can create a host server. Which will work as client + server and will take decisions for every other client in the network
Which one is the best? That depends on your game, we can't know certainly in this guide.
Why are you telling me this now?
Because in this guide we will be working on Server + Client type, so we want you to know that there are other ways to connect to the Server besides this guide.
Continuing with the guide
Now, we need to connect to our server, so for this, we have two roads, write down a script and make the server start, or just use the HUD.
Initiate Server By Scripting
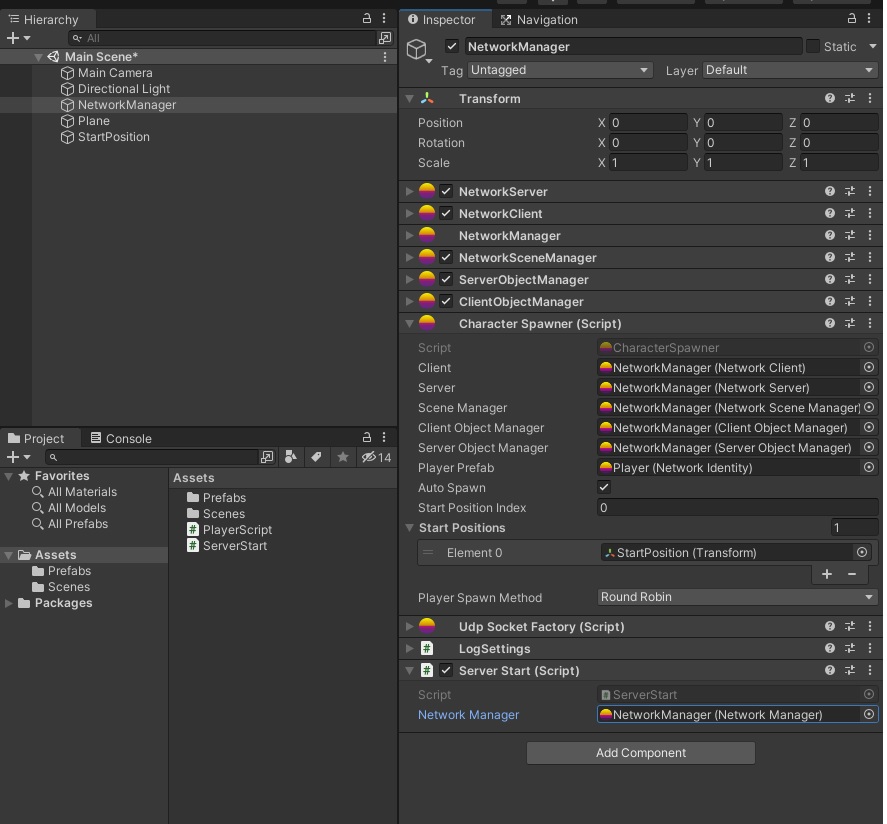
This one is pretty simple, we just need to go to our NetworkManager GO then
- Create a new script, we can call it
StartServer - Then server starts should look like this:
using Mirage;
using UnityEngine;

namespace GettingStarted
{
    public class StartServer : MonoBehaviour
    {
        [SerializeField] private NetworkManager networkManager;

        private void Start()
        {
            if (!networkManager) { return; }

            networkManager.Server.StartServer(networkManager.Client);
        }
    }
}
After we save the file, we go back into our NetworkManager GO, and assign the NetworkManager field to the script.
Understanding Network Hud
From here: This guide was written for Mirror so some information might be out-of-date for Mirage
Names And Colours
Player name above heads
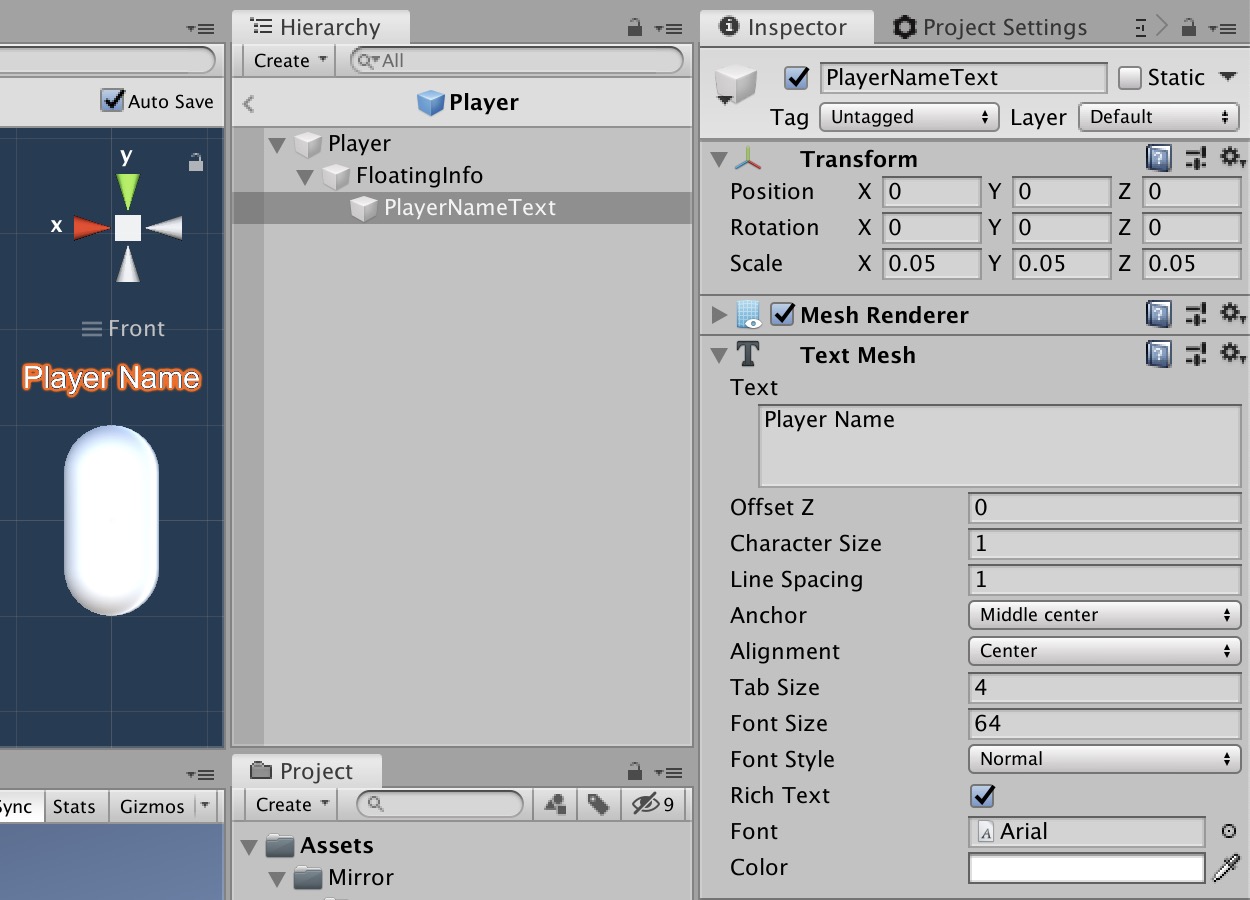
- Inside your player Prefab, create an empty GameObject
- name it something like
FloatingInfo- position Y to 1.5
- scale X to -1
- Inside that
FloatingInfo, create a 3D text using Unity menu (GameObject - 3D Object - 3D Text), - Set it up as shown in the picture below
Update your PlayerScript.cs with this:
using Mirage;
using UnityEngine;

namespace QuickStart
{
    public class PlayerScript : NetworkBehaviour
    {
        public TextMesh playerNameText;
        public GameObject floatingInfo;

        private Material playerMaterialClone;

        [SyncVar(hook = nameof(OnNameChanged))]
        public string playerName;

        [SyncVar(hook = nameof(OnColorChanged))]
        public Color playerColor = Color.white;

        [ServerRpc]
        public void CmdSetupPlayer(string _name, Color _col)
        {
            // player info sent to server, then server updates sync vars which handles it on all clients
            playerName = _name;
            playerColor = _col;
        }

        private void Awake() {
            Identity.OnStartLocalPlayer.AddListener(OnStartLocalPlayer);
        }

        private void OnStartLocalPlayer()
        {
            Camera.main.transform.SetParent(transform);
            Camera.main.transform.localPosition = new Vector3(0, 0, 0);

            floatingInfo.transform.localPosition = new Vector3(0, -0.3f, 0.6f);
            floatingInfo.transform.localScale = new Vector3(0.1f, 0.1f, 0.1f);

            string name = "Player" + Random.Range(100, 999);
            Color color = new Color(Random.Range(0f, 1f), Random.Range(0f, 1f), Random.Range(0f, 1f))
            CmdSetupPlayer(name, color);
        }

        private void OnNameChanged(string _Old, string _New)
        {
            playerNameText.text = playerName;
        }

        private void OnColorChanged(Color _Old, Color _New)
        {
            playerNameText.color = _New;
            playerMaterialClone = new Material(GetComponent<Renderer>().material);
            playerMaterialClone.color = _New;
            GetComponent<Renderer>().material = playerMaterialClone;
        }

        private void Update()
        {
            if (!IsLocalPlayer)
            {
                // make non-local players run this
                floatingInfo.transform.LookAt(Camera.main.transform);
                return;
            }

            float moveX = Input.GetAxis("Horizontal") * Time.deltaTime * 110.0f;
            float moveZ = Input.GetAxis("Vertical") * Time.deltaTime * 4f;

            transform.Rotate(0, moveX, 0);
            transform.Translate(0, 0, moveZ);
        }
    }
}
Add the PlayerNameText and FloatingInfo objects into the script on the player prefab, as shown below.
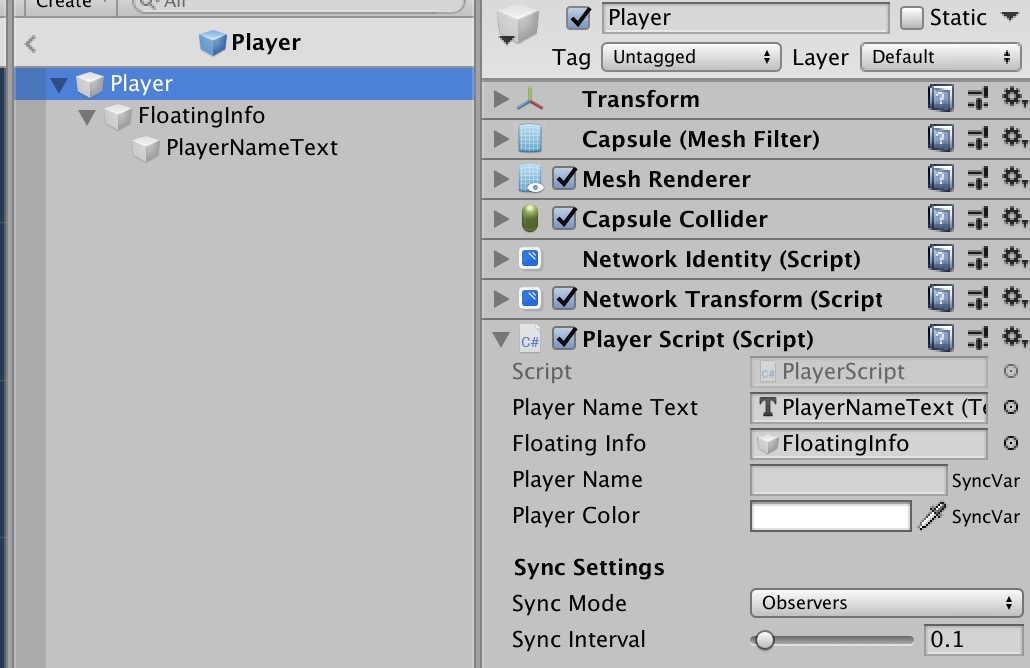
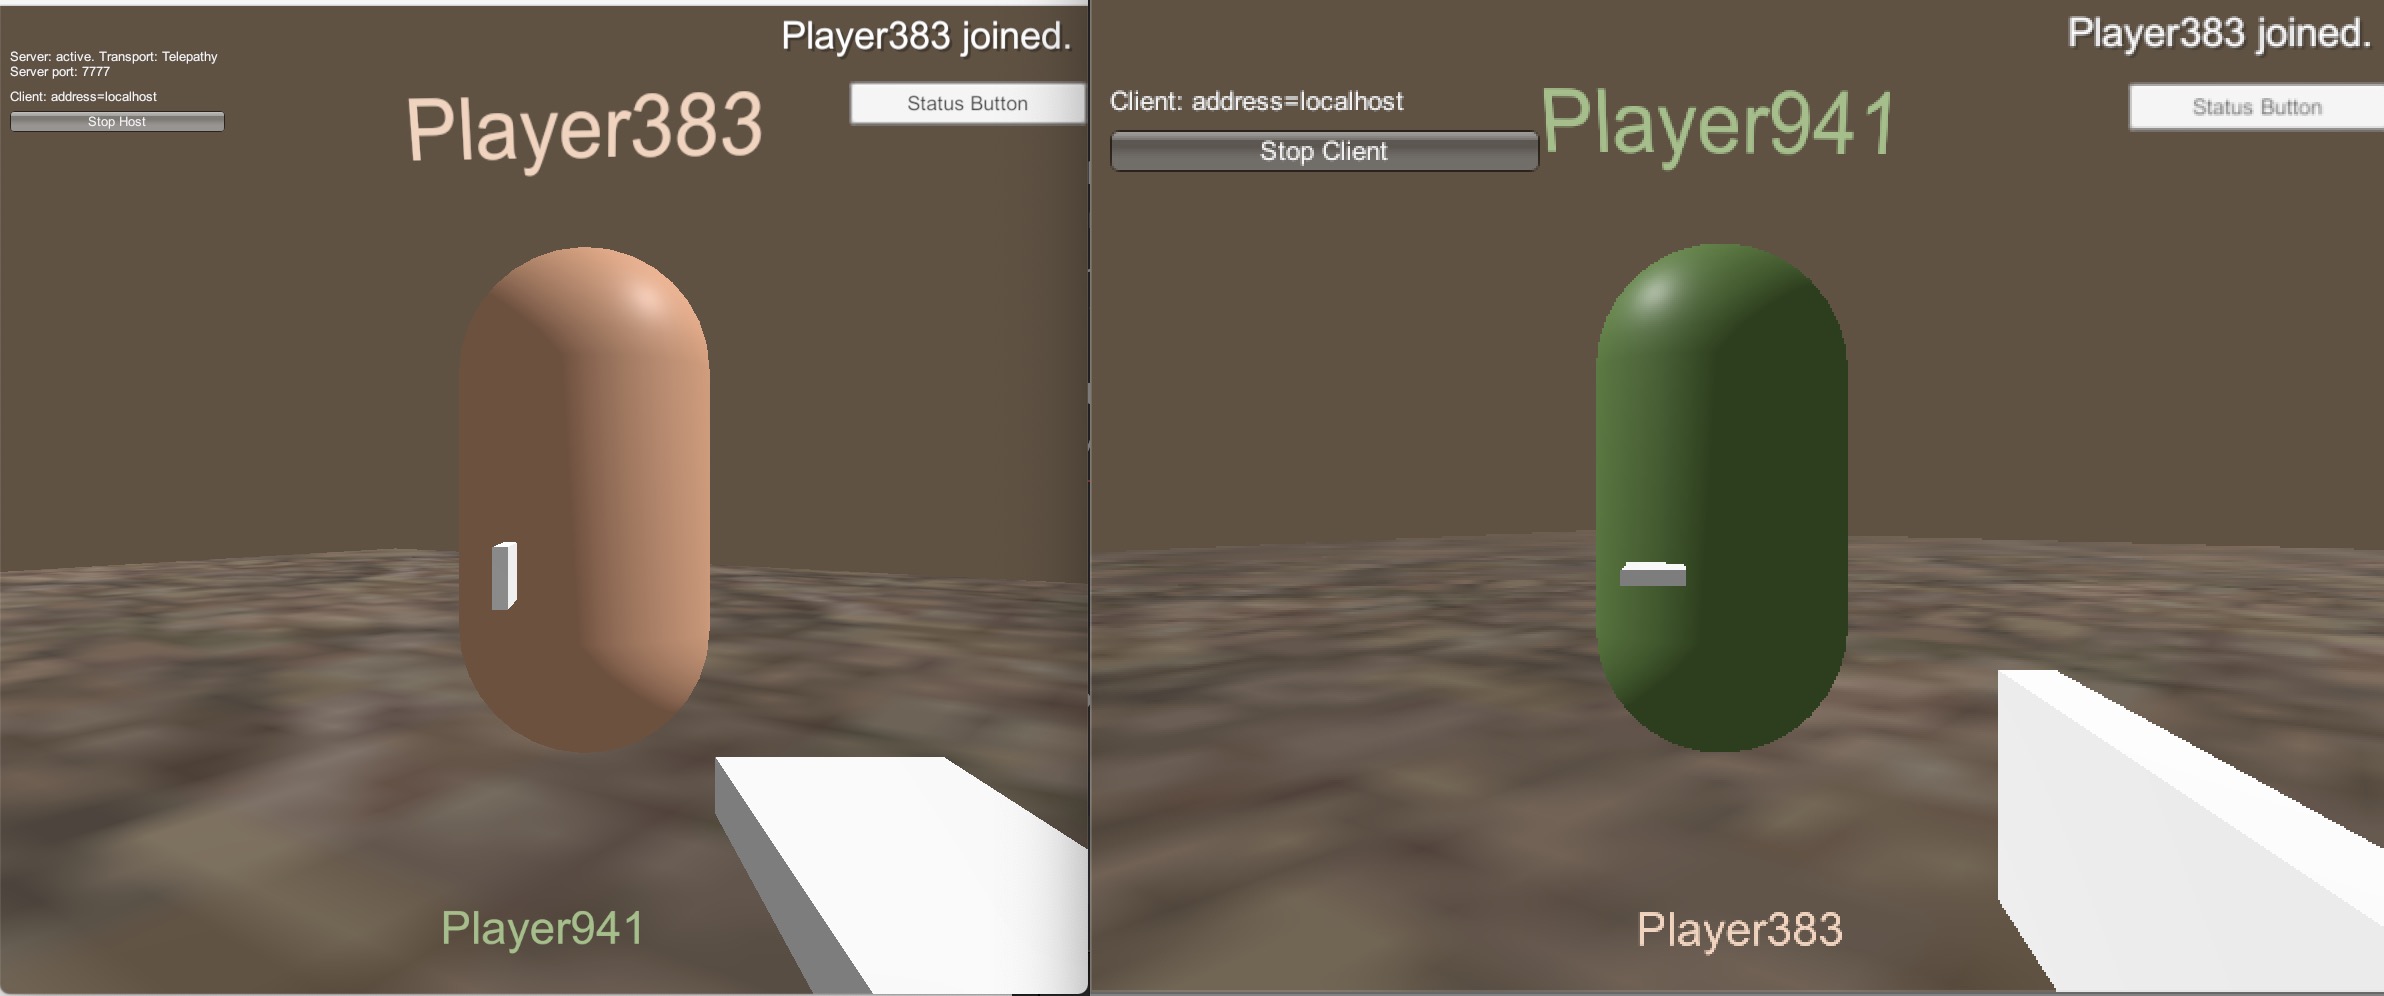
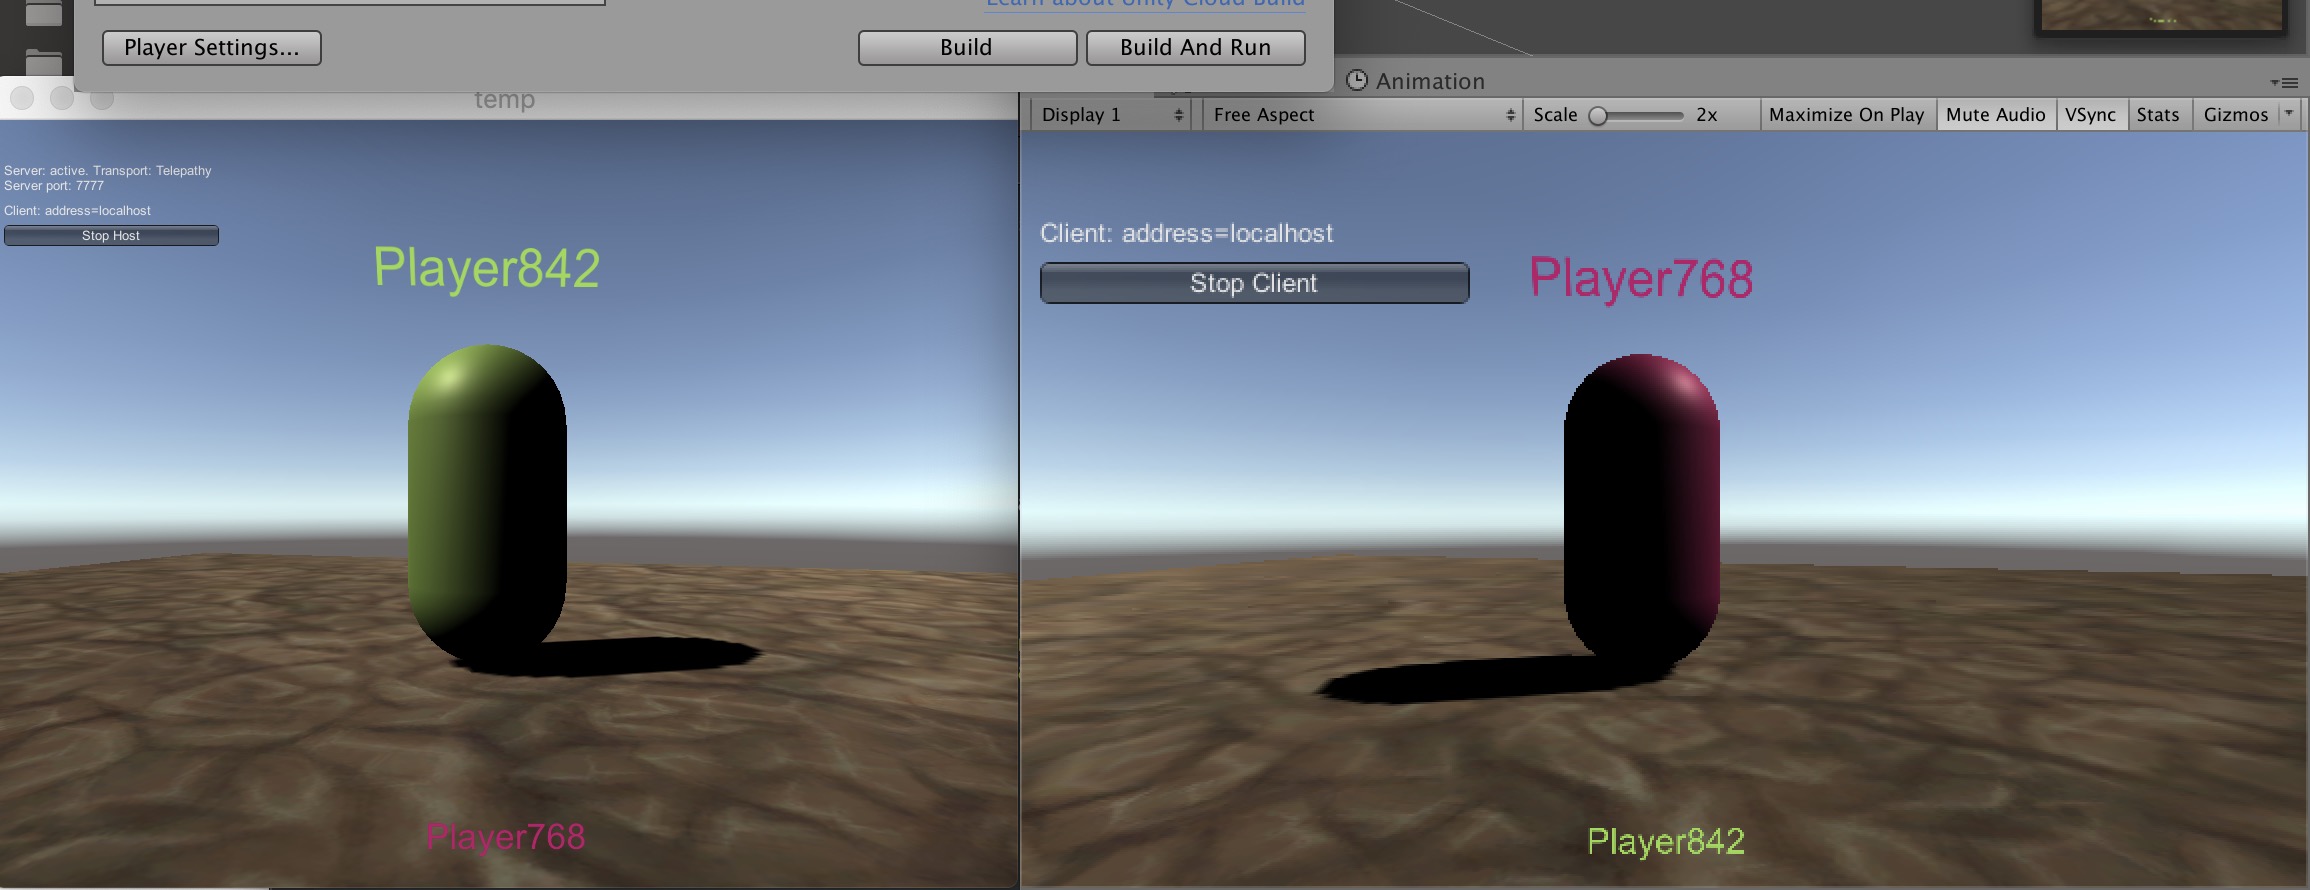
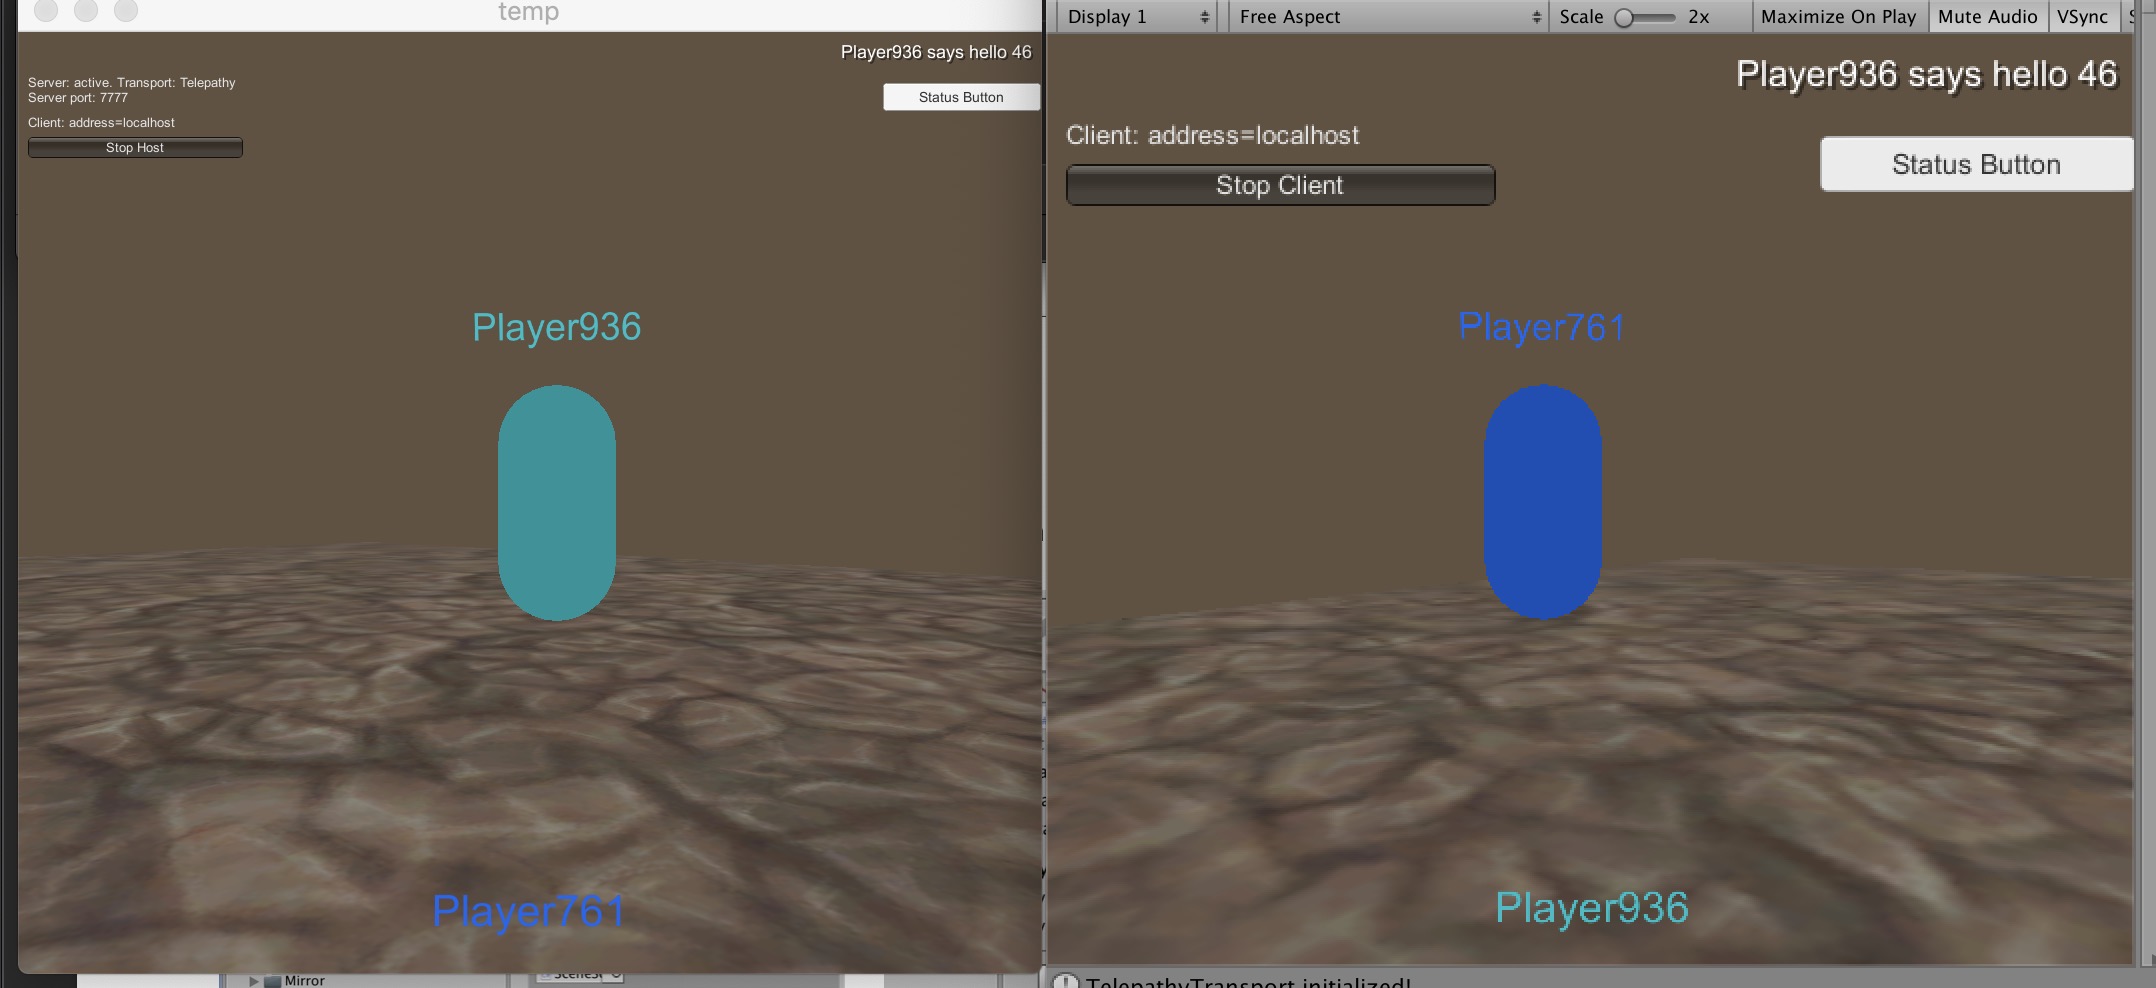
Now if you build and run, host on one, and join on the other, you will see player names and colors synced across the network!
Well done, 5 stars to you!
Part 11
A scene networked object all can access and adjust.
Create a SceneScript.cs, and add it onto an empty GameObject in the scene called SceneScript.
Then create a Canvas with text and a button, similar to the image below.
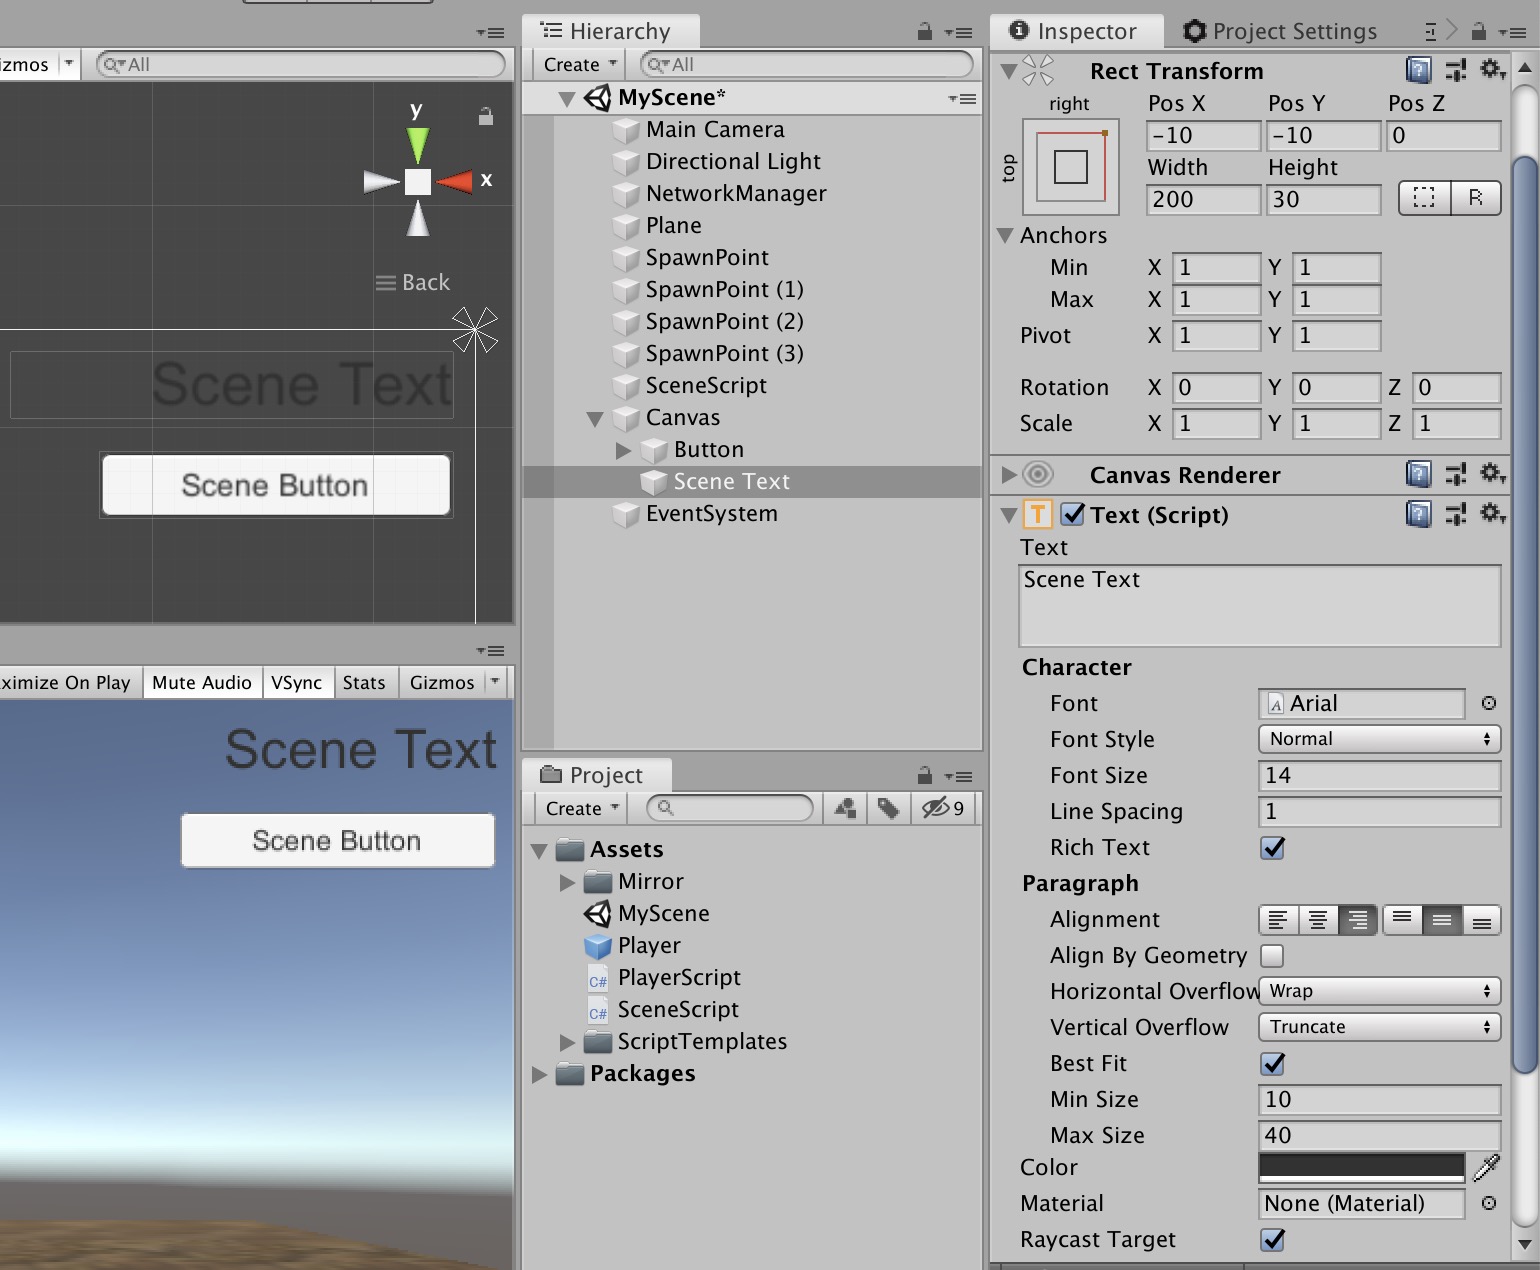
Add the sceneScript variable, Awake function, and CmdSendPlayerMessage to PlayerScript.cs Also add the new playerName joined line to CmdSetupPlayer();
private SceneScript sceneScript;

void Awake()
{
    //allow all players to run this
    sceneScript = GameObject.FindObjectOfType<SceneScript>();
    Identity.OnStartLocalPlayer.AddListener(OnStartLocalPlayer);
}
[ServerRpc]
public void CmdSendPlayerMessage()
{
    if (sceneScript)
    {
        sceneScript.statusText = $"{playerName} says hello {Random.Range(10, 99)}";
    }
}
[ServerRpc]
public void CmdSetupPlayer(string _name, Color _col)
{
    //player info sent to server, then server updates sync vars which handles it on all clients
    playerName = _name;
    playerColor = _col;
    sceneScript.statusText = $"{playerName} joined.";
}
public void OnStartLocalPlayer()
{
    sceneScript.playerScript = this;
    //. . . . ^ new line to add here
Add this code to SceneScript.cs
using Mirage;
using UnityEngine;
using UnityEngine.UI;

namespace QuickStart
{
    public class SceneScript : NetworkBehaviour
    {
        public Text canvasStatusText;
        public PlayerScript playerScript;

        [SyncVar(hook = nameof(OnStatusTextChanged))]
        public string statusText;

        void OnStatusTextChanged(string _Old, string _New)
        {
            //called from sync var hook, to update info on screen for all players
            canvasStatusText.text = statusText;
        }

        public void ButtonSendMessage()
        {
            if (playerScript != null)
            {
                playerScript.CmdSendPlayerMessage();
            }
        }
    }
}
- Attach the ButtonSendMessage function to your Canvas Button.
- Attach Canvas Scene Text to SceneScript variable.
- ignore SceneScript’s,
playerScriptvariable, it automatically sets this!
- ignore SceneScript’s,
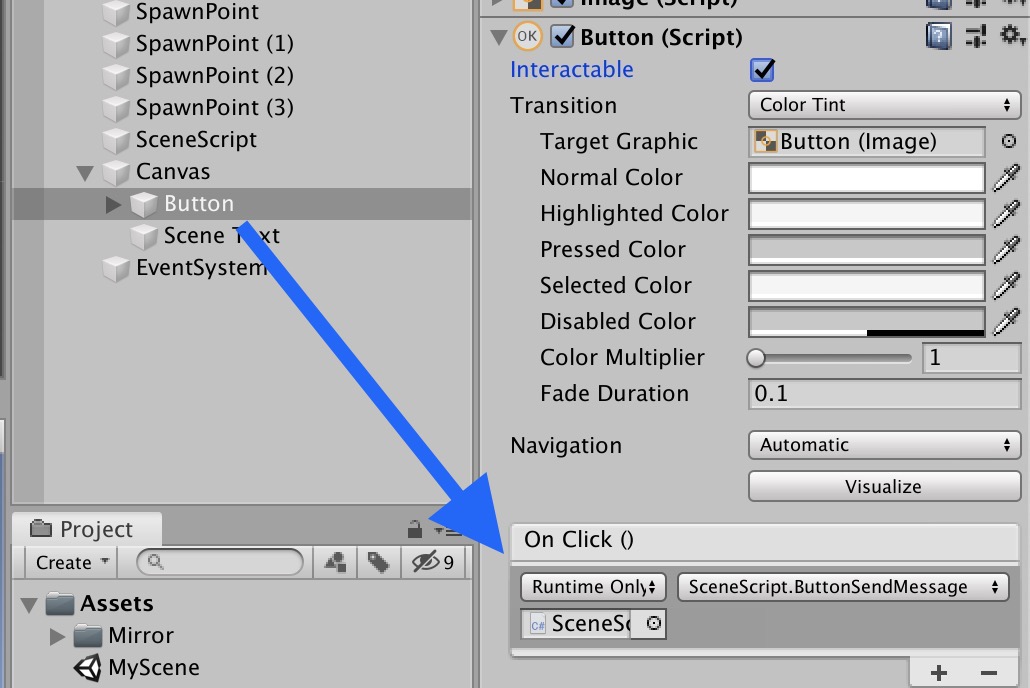
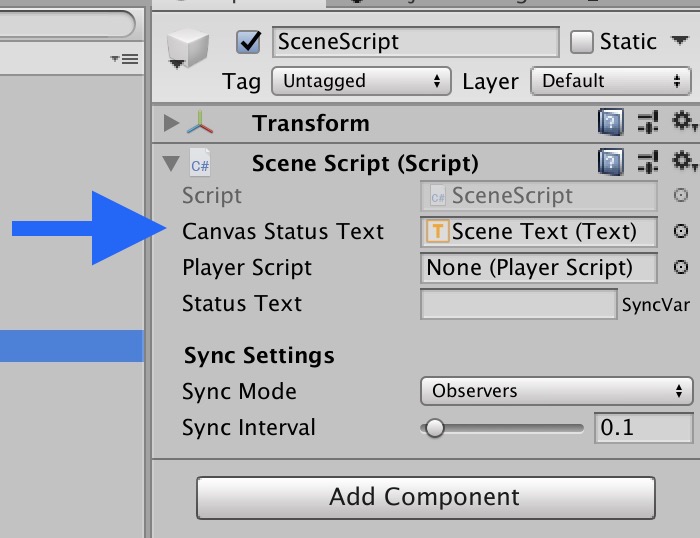
Now if you build and run, host, and join, you can send messages, and have a text log for actions!
Wahooo!
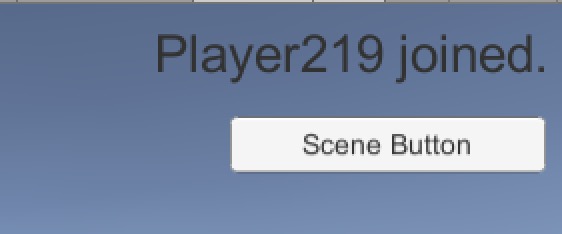
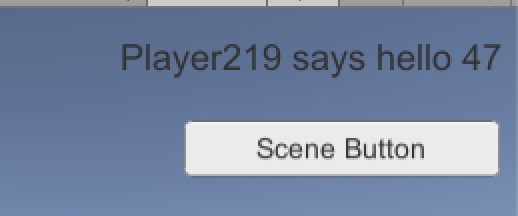
Experiment and adjust, have fun!
Weapon Switching
Weapon switching! The code bits.
Add the following to your PlayerScript.cs
private int selectedWeaponLocal = 1;
public GameObject[] weaponArray;

[SyncVar(hook = nameof(OnWeaponChanged))]
public int activeWeaponSynced;

void OnWeaponChanged(int _Old, int _New)
{
    // disable old weapon
    // in range and not null
    if (0 < _Old && _Old < weaponArray.Length && weaponArray[_Old] != null)
    {
        weaponArray[_Old].SetActive(false);
    }

    // enable new weapon
    // in range and not null
    if (0 < _New && _New < weaponArray.Length && weaponArray[_New] != null)
    {
        weaponArray[_New].SetActive(true);
    }
}

[ServerRpc]
public void CmdChangeActiveWeapon(int newIndex)
{
    activeWeaponSynced = newIndex;
}

void Awake()
{
    // disable all weapons
    foreach (var item in weaponArray)
    {
        if (item != null)
        {
            item.SetActive(false);
        }
    }
}
Add the weapon switch button in Update. Only the local player switches its own weapon, so it goes below the !IsLocalPlayer check.
void Update()
{
    if (!IsLocalPlayer)
    {
        // make non-local players run this
        floatingInfo.transform.LookAt(Camera.main.transform);
        return;
    }

    float moveX = Input.GetAxis("Horizontal") * Time.deltaTime * 110.0f;
    float moveZ = Input.GetAxis("Vertical") * Time.deltaTime * 4f;

    transform.Rotate(0, moveX, 0);
    transform.Translate(0, 0, moveZ);

    if (Input.GetButtonDown("Fire2")) //Fire2 is mouse 2nd click and left alt
    {
        selectedWeaponLocal += 1;

        if (selectedWeaponLocal > weaponArray.Length)
        {
            selectedWeaponLocal = 1;
        }

        CmdChangeActiveWeapon(selectedWeaponLocal);
    }
}
Weapon models
Add the basic cube weapons first, change these later.
- Double click your player prefab to enter it
- Add a "WeaponsHolder" empty GameObject, with position and rotation at 0,0,0.
- Inside that GameObject, create a cube from the Unity menu, (GameObject, 3D object, cube)- Remove the box colliders.
- Rename this
Weapon1, change position and scale to match the below pictures.
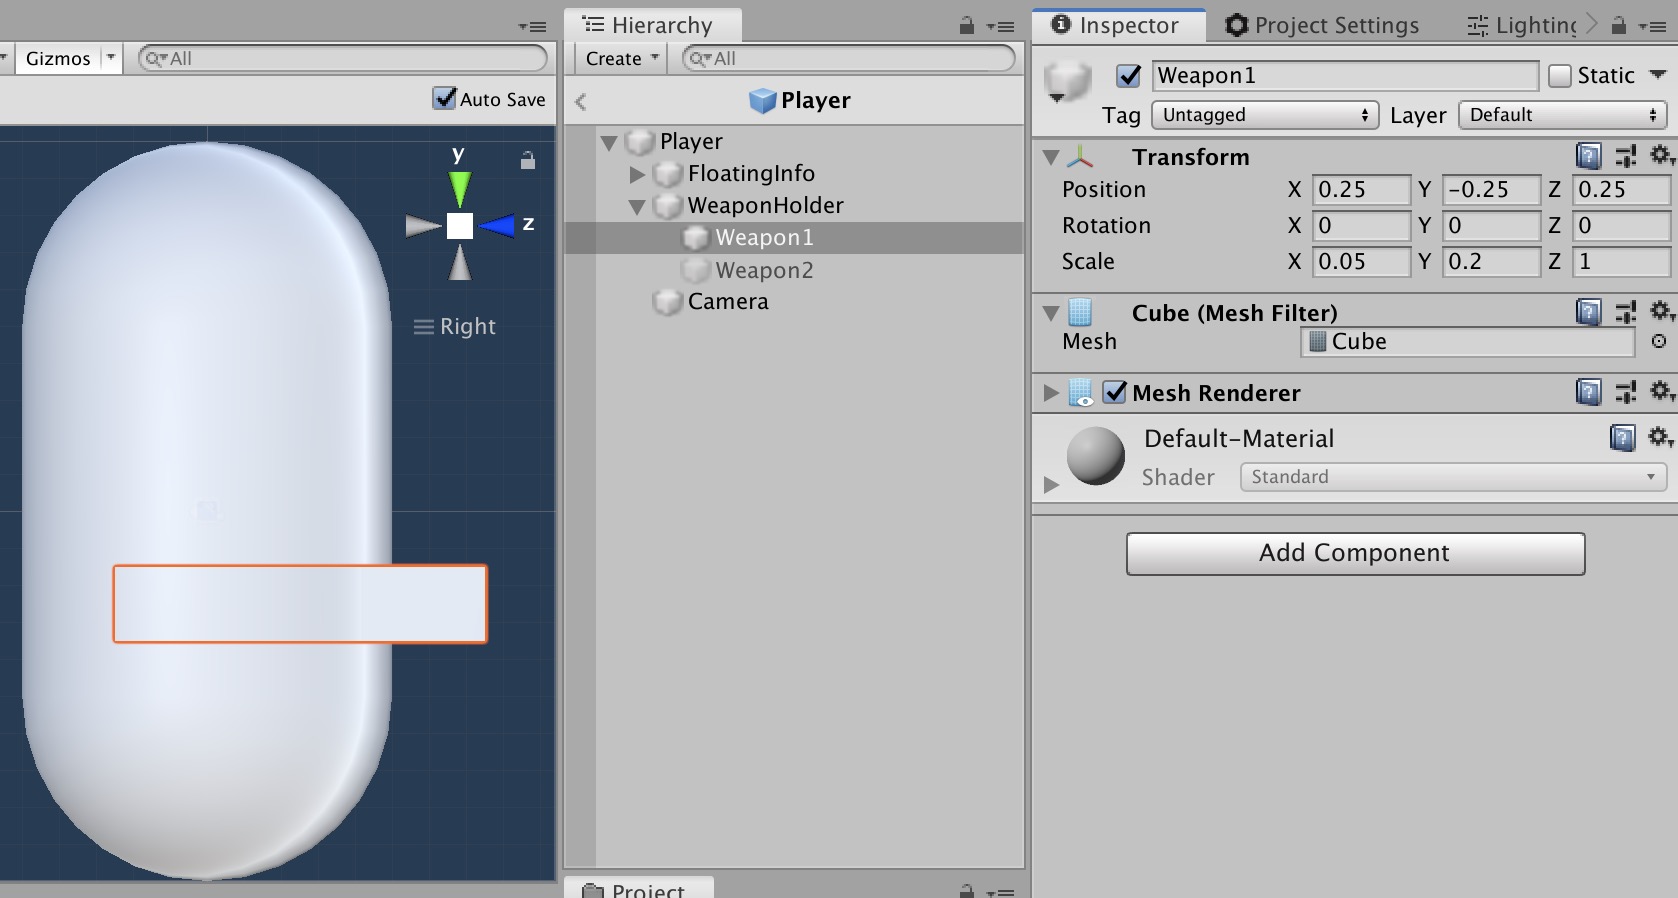
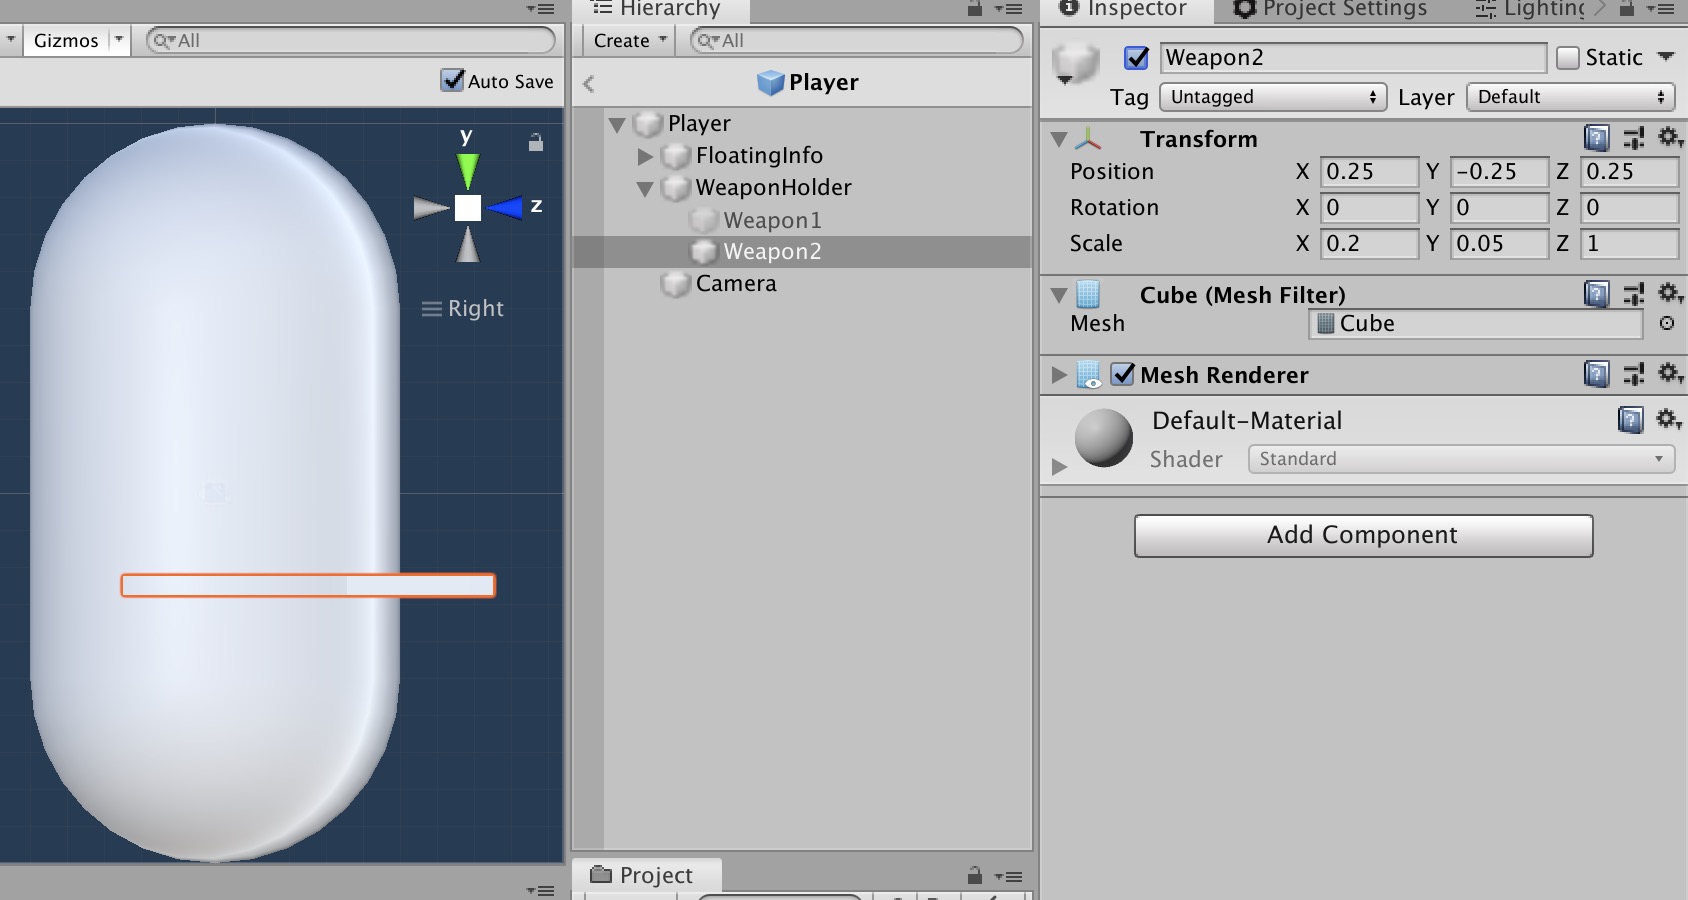
Duplicate weapon 1 for Weapon 2, and change its scale and position, now you should have 2 different looking ‘weapons’!
Part 14
Weapon switch finale.
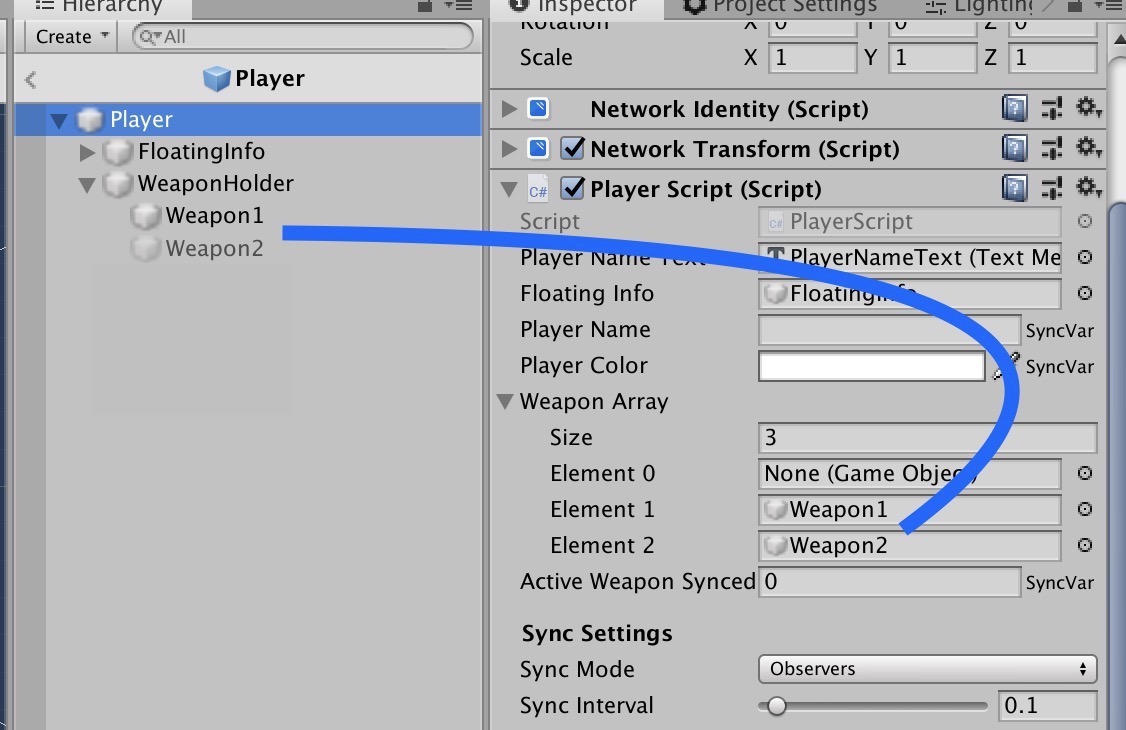
- Add these 2 GameObjects to your PlayerScript.cs weapons array.
- Disable weapon 2, so only weapon 1 shows when spawning.
Build and run!
You should see each player switching weapons, and whatever your player has equipped, will auto show on new joining players (sync var and hook magic!)
