Getting Started
This document describes the steps to creating a multiplayer game with Mirage. The process described here is a simplified, higher-level version of the actual process for a real game; it doesn’t always work exactly like this, but it provides a basic recipe for the process.
Installation
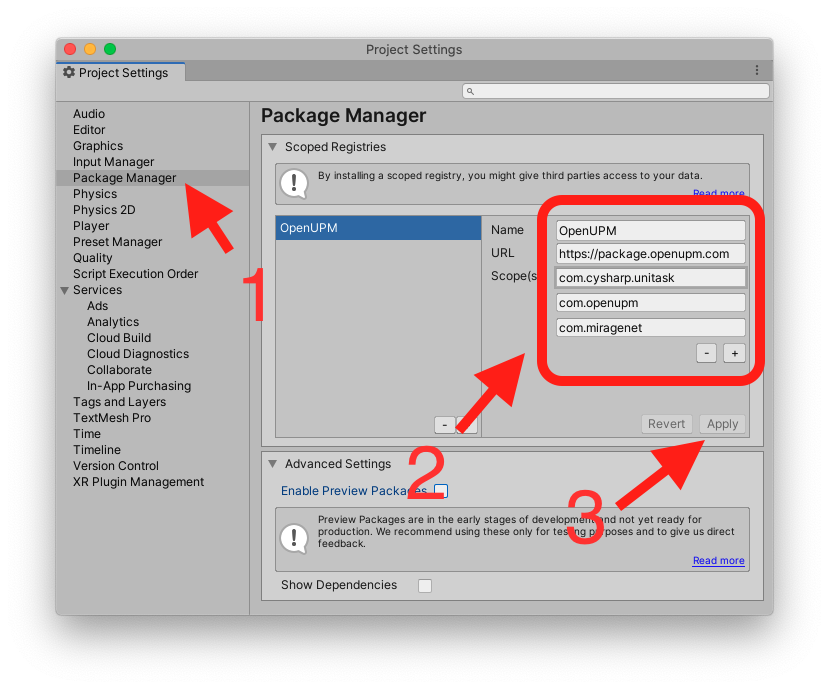
Before everything, to install Mirage we need to add a new package manager repository to our project. To do this, we can go into Edit menu and then Project Settings.
This will open a new Editor Window with multiple tabs. The one we are looking for is Package Manager, so click there.
Once you click there, you should add a new Package Manager, so complete the fields as we show next and click apply
Name: OpenUPM
Url: https://package.openupm.com
Scopes:
- com.cysharp.unitask
- com.openupm
- com.miragenet
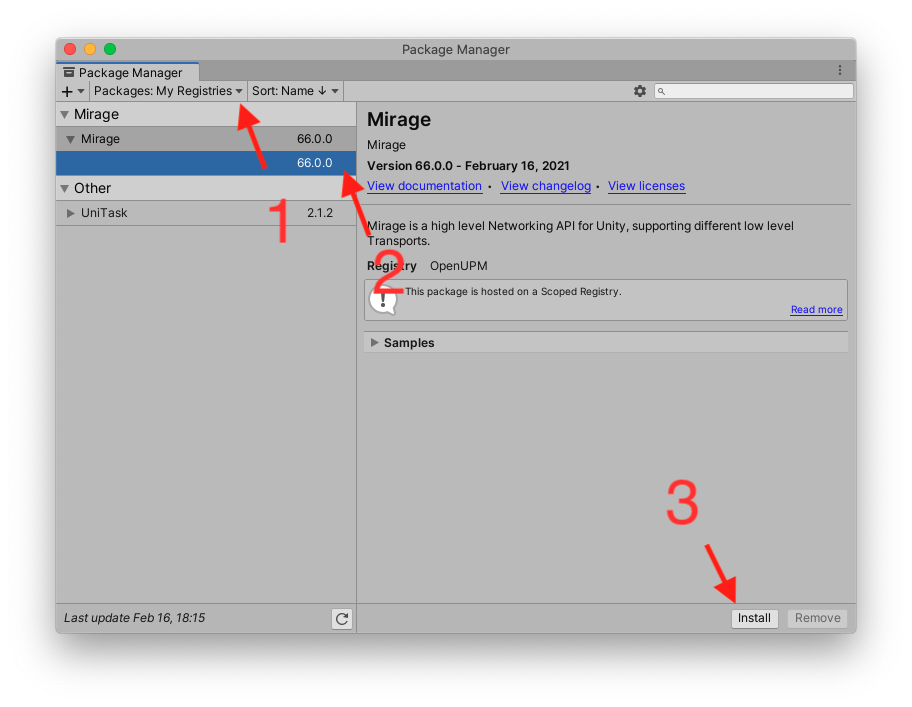
Once everything is ready, the next step is to close the Project Settings window, and jump into the Package Manager. So for this, we click on Window menu and then Package Manager.
At this window, we will click on a small button that says (probably, at today date on Unity Editor 2021.13f) Packages: In Project, here we have to select My registries.
Once, you've done that, we should be able to see Mirage and a few transport and also plugins in that list.
After selecting, you can choose the version on the list below the name, otherwise, you can just click install on the bottom right part of the window and after a loading bar, that's it. You already have Mirage API on your code, congrats!
Video Tutorials
Currently, there are no Mirage-specific videos. You can use Mirror's existing videos alongside our Mirror to Mirage Conversion guide.
Networking Set-Up
- Right click in the Scene, select Network → NetworkManager. This will create a new GameObject with all the necessary networking components set up for you.
- Add the NetworkManagerHUD component to the game object. This provides an out-of-the-box canvas UI system that you can use and create your own UI. Assign the variables to properly set up the UI so everything will interact with network code. In the future, we will be providing out-of-the-box UI that auto sets up.
Player Prefab
- Create a new prefab in your project.
- Add a NetworkIdentity component to the player prefab
- Set the
playerPrefabfield on theCharacterSpawnercomponent to the player prefab. You can find this component on the GameObject you created in the first setup.
See character objects for more information.
Player Movements
Attach the correct type of movement script you intended to use. NetworkTransform will move the transform component without physics calculations. If you require physics to be also part of your normal movement calculations suggestion would be to attach a NetworkRigidBody component instead.
Currently network transform and network rigid body components cannot handle various lag and drop of packets. Jitter or lag behind may occur. We are working to improve these components and have better lag and jitter control in the future.
- Add the correct movement component you require.
- Check box client authority under the component if you want the player to be able to fully control movement without the server controlling it.
If client authority is checked then hacking can occur due to trusting clients and accepting their movement. if you do not want this do not check client authority under the component and you will require to send commands to the server to allow movement to occur.
- Update input and control scripts to reflect what type of control you want. See below for different examples.
If you require a camera to run on player prefab subscribe to Identity.OnStartLocalPlayer event to take control of the Main Camera in the scene for the player. You do not need a camera on every player prefab.
For example, if client authority has been checked and you trust clients. Never trust clients though.
public class GettingStartedClientAuthority : NetworkBehaviour
 {
     private void Update()
     {
         if (!IsLocalPlayer)
             return;

         // handle player input for movement
     }
 }
For example, if server authority is going to be used.
public class GettingStartedServerAuthority : NetworkBehaviour
 {
     private void Update()
     {
         if (!IsLocalPlayer)
             return;

         // handle player input for movement

         // You would call this command after handling input or you can send inputs directly to
         // server and let server buffer inputs up and do movements based on the buffered inputs.
         MovePlayer();
     }

     [ServerRpc]
     private void MovePlayer()
     {
         // We are now firing off some kind of movement all done by server.
     }
 }
Basic Player Game State
- Make scripts that contain important data into NetworkBehaviours instead of MonoBehaviours
- You can sync different types of data depending on what you need to sync.
Remote Actions
- Make scripts that perform important actions into NetworkBehaviours instead of MonoBehaviours
- Update functions that perform important player actions to have an attribute of
[ServerRpc]
See Remote Actions.
Non-player game objects
Fix non-player prefabs such as enemies:
- Add the
NetworkIdentifycomponent - Add the correct component needed to sync movement as the state above with player movement.
- Once all objects have a network identity. Find ClientObjectManager under the
NetworkManagergame object in the scene and hit register prefabs. - Update scripts with game state and actions
Spawners
- Potentially change spawner scripts to be NetworkBehaviours
- Modify spawners to only run on the server (use
IsServerproperty or theOnStartServercallback) - Call
ServerObjectManager.Spawn()for created game objects
Spawn positions for players
- Add a new game object and place it at the player's start location
- Add this GameObject to the
CharacterSpawner'sPositionslist.